Build A Custom Static Site with Headless Ghost + Astro
Learn how to create a site using Ghost as a headless CMS and build a completely custom front-end with the Astro web framework


Astro is an all-in-one web framework for building fast, content-focused websites.
A full working example with Casper theme can be found here.
Prerequisites
You will need a Ghost instance (remotely or locally) to source content and get site related credentials.
Create a new Astro site with the following command:
# npm
npm create astro@latest

# yarn
yarn create astro
Getting Started
Install the Ghost Content API helper:
yarn add @tryghost/content-api @tryghost/helpersThe next step is to get the API URL and Content API Key of the Ghost site.
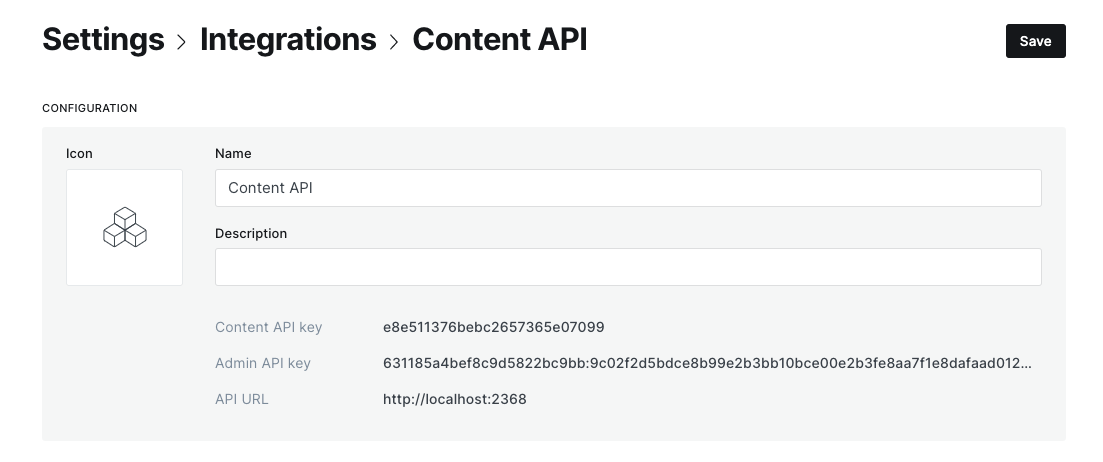
- Go to your "Settings" page in Ghost admin
- Under "Advanced" section, click on "Integrations"
- Scroll down and click on "Add Custom Integrations"
- Enter a meaning name and retrieve the credentials
Create an .env.local file in the root directory and add the following:
GHOST_CONTENT_API_URL=your_api_url
GHOST_CONTENT_API_KEY=your_api_key
SITE_URL=your astro development url, e.g http://localhost:3000Update the .gitignore file as well by replacing with the following
...

# environment variables
.env*.local
.env.production

...Create a helper client by using the environment variables. Use import.meta.env to reference the variables.
import GhostContentAPI from '@tryghost/content-api'

// Create API instance with site credentials
const ghostClient = new GhostContentAPI({
  url: import.meta.env.GHOST_CONTENT_API_URL!,
  key: import.meta.env.GHOST_CONTENT_API_KEY!,
  version: 'v5.0',
})

export default ghostClientImport aliases
Astro supports import aliases that you define in your tsconfig.json & jsconfig.json paths configuration.
{
  "compilerOptions": {
    "baseUrl": ".",
    "paths": {
      "@components/*": ["src/components/*"],
      "@layouts/*": ["src/layouts/*"]
    }
  }
}Querying Data
The Ghost API provides 5 types of nodes:
- Post
- Page
- Author
- Tag
- Settings
The Ghost content API helper library has different methods for each node type. All the methods are shown in the Javascript documentation.
To see the contents of the response for each type of node, refer to the API endpoints documentation.
Using the helper from before, you can query the node of type post like so:
---
import ghostClient from '@utils/ghost-client';

const posts = await ghostClient.posts.browse({
	limit: 'all',
    include: ['tags', 'authors']
});
---

<main>
	<!-- Do something with the posts --->
</main>Build the layout component
Using the settings API, we can build a Layout component that mirrors our Ghost blog settings
---
import ghostClient from '@utils/ghost-client';
import SiteHeader from '@components/SiteHeader.astro';
import SiteFooter from '@components/SiteFooter.astro';

const settings = await ghostClient.settings.browse();
---

<!DOCTYPE html>
<html lang={settings.lang}>
<head>
    <title>{title ?? settings.meta_title ?? settings.title}</title>
    <meta
      name="description"
      content={description ?? settings.meta_description ?? settings.description}
    />
    <!-- more head stuff --->
</head>
<body>
	<SiteHeader />
	<slot />
    <SiteFooter />
</body>
</html>Now we can use the Layout component in our pages:
---
import ghostClient from '@utils/ghost-client';
import Layout from '@layouts/Layout.astro';

const posts = await ghostClient.posts.browse({
	limit: 'all',
    include: ['tags', 'authors']
});
---

<Layout>
    <main id="site-main" class="site-main outer">
        <div class="inner posts">
            <div class="post-feed">
            	{posts.map((post) => (
                	<article>
                    	<h1>{post.title}</h1>
                        <div set:html={post.html} />
                    </article>
                ))}
            </div>
        </div>
    </main>
</Layout>Dynamic routes with props
To set dynamic routes in Astro, create a file using [bracket] notation and export a getStaticPaths function that specifies the paths to be pre-rendered. You can pass props to each path as well, which saves us from fetching separately.
---
import ghostClient from '@utils/ghost-client';
import Layout from '@layouts/Layout.astro';
import Page from '@components/Page.astro';
import Post from '@components/Post.astro';

export async function getStaticPaths() {
  const browseParams: Params = {
    limit: 'all',
    include: ['tags', 'authors'],
  };

  const posts = await ghostClient.posts.browse(browseParams);
  const pages = (await ghostClient.pages.browse(browseParams)).map((page) => ({
    page: true,
    ...page,
  }));
  const postsOrPages = [...posts, ...pages];

  return postsOrPages.map((postOrPage) => ({
    params: { slug: postOrPage.slug },
    props: { postOrPage },
  }));
}

const { postOrPage } = Astro.props;
---
<Layout>
    <main class="container">
      {postOrPage.page ? <Page page={postOrPage} /> : <Post post={postOrPage} />}
    </main>
</Layout>Site Settings
You can fetch the site settings like so:
---
import ghostClient from '@utils/ghost-client';

const settings = await ghostClient.settings.browse();
---

<!DOCTYPE html>
<html lang={settings.lang}>
	<!-- content -->
</html>Astro allows us to share state between components using nanostores (instead of context providers in React or Vue). To access these settings in other parts of the site, create a nanostores atom at store/settings.ts:
import { atom } from 'nanostores';
import ghostClient from '@utils/ghost-client';

const settingsResponse = await ghostClient.settings.browse();

export const settings = atom(settingsResponse).get();
And then use it in our components:
---
import ghostClient from '@utils/ghost-client';
import settings from '@store/settings';
---

<!DOCTYPE html>
<html lang={settings.lang}>
	<!-- content -->
</html>Formatting post dates
The dates of a post, such as post.published_at, is returned as a date timestamp e.g. 2019-11-26T02:43:13.000+00:00.
We can output the published date as “Aug 29, 2022” using the Intl API:
<footer class="post-card-meta">
  {
    post.published_at && (
      <div class="post-card-meta-date">
        {new Intl.DateTimeFormat('en-US', {
          year: 'numeric',
          month: 'short',
          day: 'numeric',
        }).format(new Date(post.published_at))}
      </div>
    )
  }
</footer>
Alternatively, there are date/time utility libraries such as moment.js or date-fns to achieve similar results.