Build a Chat App with NextJS + Supabase
In this tutorial we will create a simple chat app using NextJS (Typescript) and Supabase.


![]()
![]()
![]()
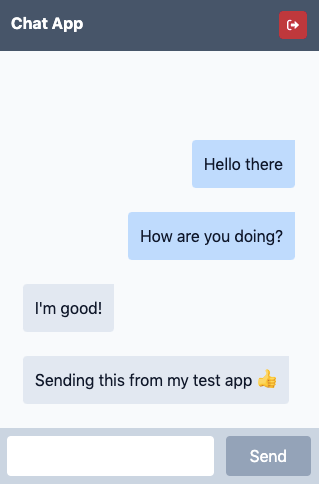
In this project, users will sign in using magic email link and exchange messages in a single chatroom.
The issue with React Strictmode and Supabase Realtime has been fixed with the release of supabase-js v2, and this article as well as the Github repo has been updated.
Overview
The complete code for this tutorial can be found here.
Supabase setup
Before we start building our app, we're going to setup our database and API in Supabase.
Create a project
- Go to app.supabase.com (and create a free account if you haven't already)
- Click on "New Project"
- Enter your project details
- Wait for project to complete initializing
Database schema setup: Auth
For this, we can use the "User Management Starter" quickstart in the SQL Editor.
- Go to the "SQL Editor" section.
- Click "User Management Starter"
- Click "Run".
That's all. Next, we will setup the schema to store our messages.
Database schema setup: Messages
- Go to "Table Editor"
- Add a table named
messageswith the following settings and columns:
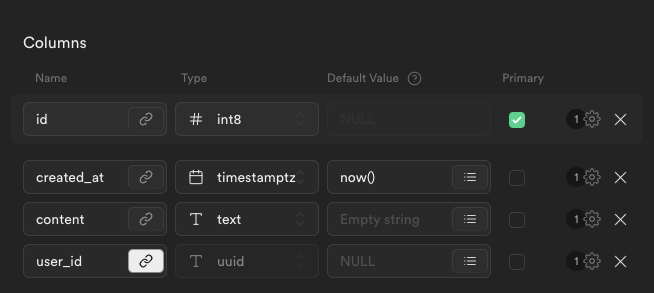
user_id references theid column in auth.users tableSetup table policies
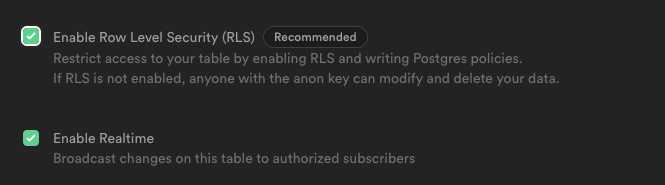
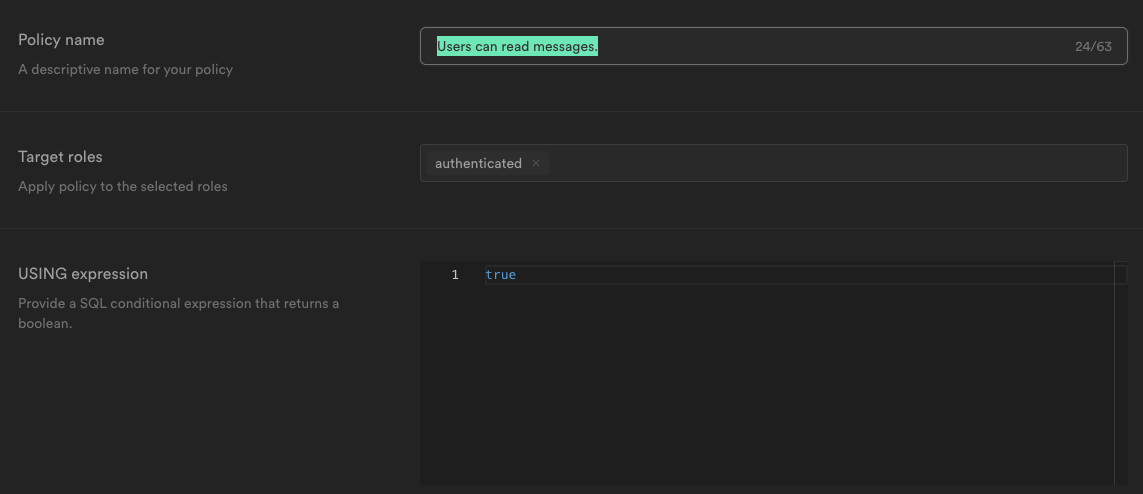
We will need to setup our policies to allow read and write access to our messages tables.
- Go to "Authentication" and click on "Policies"
- Under
messages, add the following 2 policies
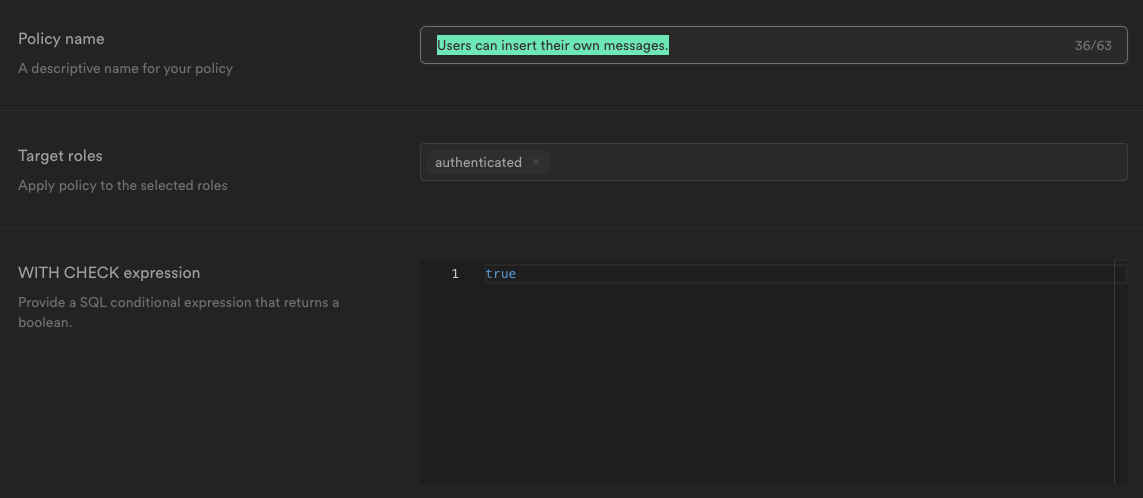
Policy name: "Users can insert their own messages."
Policy name: "Users can read messages."
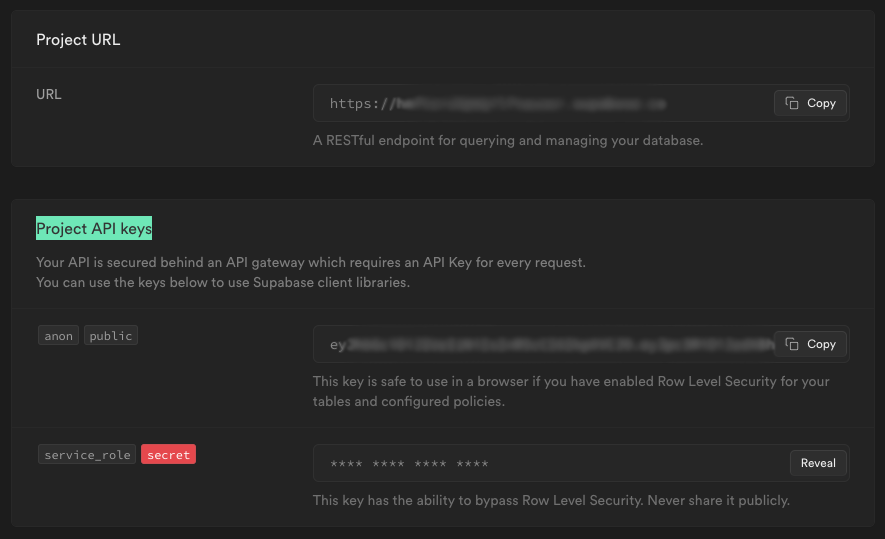
API credentials
- Go to "Settings" > "API"
- Under "Project API keys", there's your
API URLandanon key. We will be using them later for the connection to Supabase
Building the app
The app will consist of 2 parts - user authentication and the chat functionality. We will be using NextJS/React/Typescript and TailwindCSS to style our components.
To speed things up, clone the following starter template to your preferred directory.
git clone https://github.com/yongzhenlow/nextjs-starter chat-appThen, install the Supabase JS client library (using v2, note the @rc at the end)
yarn add @supabase/supabase-js@rcEnvironment variables
Create a file .env.local with the API credentials from before
NEXT_PUBLIC_SUPABASE_URL=https://example.supabase.co
NEXT_PUBLIC_SUPABASE_ANON_KEY=youranonkeyNow let's create a helper to initialize the Supabase client
import { createClient } from '@supabase/supabase-js'

export const supabase = createClient(
  process.env.NEXT_PUBLIC_SUPABASE_URL!,
  process.env.NEXT_PUBLIC_SUPABASE_ANON_KEY!
)
Create the login component
Since we are using TailwindCSS, we can just create and style the form right in our component.
"utils/example.ts" instead of "../utils/example.ts"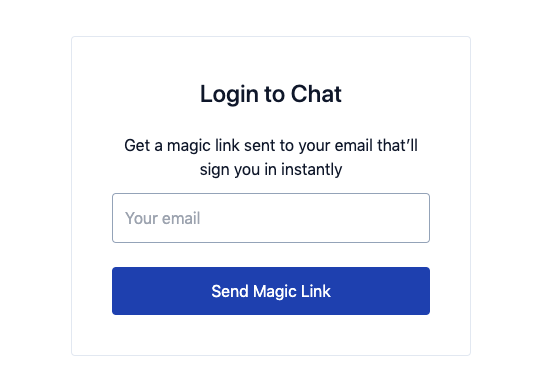
import { useState } from 'react'
import { supabase } from 'utils/supabase-client'
import type { ChangeEvent, FormEvent } from 'react'
const Auth = () => {
const [isLoading, setIsLoading] = useState<boolean>(false)
const [email, setEmail] = useState<string>('')
const handleLogin = async (e: FormEvent<HTMLFormElement>) => {
e.preventDefault()
// @todo handle validation here
if (isLoading || !email?.length) {
return false
}
try {
setIsLoading(true)
const { error } = await supabase.auth.signInWithOtp({ email })
if (error) throw error
alert('Check your email for the login link!')
} catch (error: any) {
alert(error.error_description || error.message)
} finally {
setIsLoading(false)
}
}
return (
<div className="container max-w-md mx-auto mt-10 px-6 text-slate-900 text-center">
<div className="rounded border border-slate-200 p-10">
<h1 className="font-medium text-2xl mb-6">Login to Chat</h1>
<form onSubmit={handleLogin} className="space-y-6">
<label className="block">
<span>
Get a magic link sent to your email that’ll sign you in
instantly
</span>
<input
className="block mt-3 w-full rounded border text-slate-900 border-slate-400 py-3 px-3"
type="email"
placeholder="Your email"
value={email}
onChange={(e: ChangeEvent<HTMLInputElement>) =>
setEmail(e.target.value)
}
/>
</label>
<button
className="block w-full rounded py-3 px-5 text-white bg-blue-800 hover:bg-blue-700 disabled:bg-slate-400"
disabled={isLoading}
>
{isLoading ? 'Loading...' : 'Send Magic Link'}
</button>
</form>
</div>
</div>
)
}
export default AuthDisplay the login form
Let's add the Auth component to pages/index.tsx, and leave the authenticated state empty for now while we start building the Chat components:
import type { NextPage } from 'next'
import { useState, useEffect } from 'react'
import type { Session } from '@supabase/supabase-js'
import { supabase } from 'utils/supabase-client'
import Auth from 'components/Auth'

const Home: NextPage = () => {
  const [session, setSession] = useState<Session | null>(null)

  useEffect(() => {
    const fetchSession = async () => {
      const {
        data: { session },
      } = await supabase.auth.getSession()
      setSession(session)
    }

    fetchSession()

    const {
      data: { subscription },
    } = supabase.auth.onAuthStateChange((_event, session) => {
      setSession(session)
    })

    return subscription.unsubscribe
  }, [])

  return session === null ? (
    <Auth />
  ) : (
    <>{/** @todo replace with Chat component */}</>
  )
}

export default HomeCreating the chat components
Let's create 3 components, the 1. main chat window, 2. the chat message, and 3. a "dirty little trick", AlwaysScrollIntoView component, to scroll our latest message into view whenever the DOM updates, such as receiving or typing new messages.
In a chat app, the direction of the messages are usually reversed, so many of our implementations are also reversed. For example, we prepend new messages received instead of appending. The messages are also reversed using the flex-col-reverse CSS property, which is why we need to add the AlwaysScrollIntoView component before the messages so that it renders at the bottom.
import { useEffect, useState } from 'react'
import { supabase } from 'utils/supabase-client'
import ChatMessage from 'components/ChatMessage'
import AlwaysScrollIntoView from 'components/AlwaysScrollIntoView'
import type { FormEvent, ChangeEvent, TouchEvent } from 'react'
import type { Session } from '@supabase/supabase-js'
import type { Message } from 'types'

interface ChatProps {
  session: Session
}

const Chat = ({ session }: ChatProps) => {
  const [messages, setMessages] = useState<Message[]>([])
  const [message, setMessage] = useState<string>('')
  const [isLoading, setIsLoading] = useState<boolean>(false)

  const handleSendMessage = async (
    e: FormEvent<HTMLFormElement> | TouchEvent<HTMLButtonElement>
  ) => {
    e.preventDefault()

    // Handle validation here
    if (isLoading || !session?.user) return false

    try {
      setIsLoading(true)

      await supabase
        .from('messages')
        .insert([{ content: message, user_id: session.user.id }])

      // Reset message input field
      setMessage('')
    } catch (error: any) {
      console.error(error)
    } finally {
      setIsLoading(false)
    }
  }

  // Fetch initial messages
  useEffect(() => {
    const fetchMessages = async () => {
      const { data: messages, error } = await supabase
        .from('messages')
        .select()
        .order('created_at', { ascending: false })

      if (!error) {
        setMessages(messages)
      } else {
        console.error(error)
      }
    }

    fetchMessages()
  }, [])

  // Listen to messages updates
  useEffect(() => {
    const messagesChannel = supabase
      .channel('public:messages')
      .on(
        'postgres_changes',
        { event: 'INSERT', schema: 'public', table: 'messages' },
        (payload: any) => {
          // Prepend new messages received
          setMessages((m) => [payload.new as Message, ...m])
        }
      )
      .subscribe()

    return () => {
      supabase.removeChannel(messagesChannel)
    }
  }, [])

  return (
    <div className="w-screen h-screen flex flex-col bg-slate-50">
      <div className="flex flex-row flex-none p-3 justify-between bg-slate-600">
        <h1 className="font-bold text-white">Chat App</h1>
        <button
          className="bg-rose-700 hover:bg-rose-600 text-white p-2 rounded"
          type="button"
          onClick={() => supabase.auth.signOut()}
        >
          <svg
            className="w-3 h-3 fill-white"
            xmlns="http://www.w3.org/2000/svg"
            viewBox="0 0 512 512"
          >
            <path d="M96 480h64C177.7 480 192 465.7 192 448S177.7 416 160 416H96c-17.67 0-32-14.33-32-32V128c0-17.67 14.33-32 32-32h64C177.7 96 192 81.67 192 64S177.7 32 160 32H96C42.98 32 0 74.98 0 128v256C0 437 42.98 480 96 480zM504.8 238.5l-144.1-136c-6.975-6.578-17.2-8.375-26-4.594c-8.803 3.797-14.51 12.47-14.51 22.05l-.0918 72l-128-.001c-17.69 0-32.02 14.33-32.02 32v64c0 17.67 14.34 32 32.02 32l128 .001l.0918 71.1c0 9.578 5.707 18.25 14.51 22.05c8.803 3.781 19.03 1.984 26-4.594l144.1-136C514.4 264.4 514.4 247.6 504.8 238.5z" />
          </svg>
        </button>
      </div>

      <div className="flex flex-col-reverse flex-auto p-6 overflow-y-auto space-y-6 space-y-reverse min-h-[0px] text-slate-900">
        <AlwaysScrollIntoView />

        {messages.length > 0 &&
          messages.map((msg) => (
            <ChatMessage
              key={msg.id}
              fromCurrentUser={msg.user_id === session!.user!.id}
              content={msg.content ?? ''}
            />
          ))}
      </div>

      <form
        className="flex flex-row flex-none p-2 bg-slate-300 gap-x-3"
        onSubmit={handleSendMessage}
      >
        <input
          className={`flex-grow bg-white rounded p-2 focus:outline-none ${
            isLoading ? 'text-slate-600' : 'text-slate-900'
          }`}
          autoFocus
          type="text"
          value={message}
          required
          onChange={(e: ChangeEvent<HTMLInputElement>) =>
            setMessage(e.target.value)
          }
        />

        <button
          className="rounded text-white px-6 bg-blue-800 hover:bg-blue-700 disabled:bg-slate-400"
          type="submit"
          disabled={isLoading || !message || !message.length}
          onTouchEnd={handleSendMessage}
        >
          {isLoading ? 'Sending...' : 'Send'}
        </button>
      </form>
    </div>
  )
}

export default Chatinterface ChatMessageProps {
fromCurrentUser: boolean
content: string
}
const ChatMessage = ({ fromCurrentUser, content }: ChatMessageProps) => {
return (
<div className={`flex flex-row w-full ${fromCurrentUser && 'justify-end'}`}>
<div
className={`max-w-xl break-words break-all rounded rounded-tr-none p-3 ${
fromCurrentUser ? 'bg-blue-200' : 'bg-slate-200'
}`}
>
{content}
</div>
</div>
)
}
export default ChatMessageimport { useEffect, useRef } from 'react'
/**
* Scroll to this component when DOM updates, similar to
* React Native's Flatlist inverted prop.
*
* @returns HTMLDivElement
*/
const AlwaysScrollIntoView = () => {
const elementRef = useRef<HTMLDivElement | null>(null)
useEffect(() => elementRef?.current?.scrollIntoView())
return <div ref={elementRef} className="-mt-6" />
}
export default AlwaysScrollIntoViewPutting everything together
Now that we have everything in place, it is time to add our Chat component to pages/index.tsx :
import type { NextPage } from 'next'
import { useState, useEffect } from 'react'
import type { Session } from '@supabase/supabase-js'
import { supabase } from 'utils/supabase-client'
import Auth from 'components/Auth'
import Chat from 'components/Chat'

const Home: NextPage = () => {
  const [session, setSession] = useState<Session | null>(null)

  useEffect(() => {
    const fetchSession = async () => {
      const {
        data: { session },
      } = await supabase.auth.getSession()
      setSession(session)
    }

    fetchSession()

    const {
      data: { subscription },
    } = supabase.auth.onAuthStateChange((_event, session) => {
      setSession(session)
    })

    return subscription.unsubscribe
  }, [])

  return session === null ? (
    <Auth />
  ) : (
    <Chat key={session.user?.id} session={session} />
  )
}

export default HomeOnce that is done, run the development server to view the app:
yarn devOn your browser, go to http://localhost:3000 and you should see the login page. Enter your email address to get the magic link. Once you have signed in, start typing away!